Wednesday, July 31, 2013

Teacher Appreciation

I have some older projects I will be posting here in addition to new projects.  Some of the older ones may not have as many pictures of the process and if my explanation isn't clear feel free to leave a comment and I will do my very best to clarify. 

So, here we go with some Teacher Appreciation gifts!  I know that you must be thinking it is summer, this lady has lost her mind =)  Hopefully though, I will be coming up with new ideas for this school year so posting these now while they are fresh in my mind from the end of last school year.  I made 3 different gifts last year.  One for the girls' actual classroom teachers, one for the resource teachers, and one for the custodial staff.  Ladies and gentlemen, please don't forget the custodians!  These are some of the hardest workers at the school.  I know how hard it is to clean the bathroom after only 3 kids!!  I will start with those.

Now, I wanted to try to show our appreciation throughout the school without making a big hole in our wallet.  Not that it isn't deserved, only that we just don't have a whole lot extra to give.  I'd rather do my best to make it special and something to be remembered versus the price tag.

Orange Ya Glad It's Summer?


 Whole bag under $1!  After we were home I realized that a cute orange lunch bag would have been cool, but this is what we had to work with.  These were for the custodial staff and they were well received! 

Souper Teacher! 
My husband says I am so PUNNY!!  I wanted to make/do something for the special teachers, our school calls them resource teachers.  Library, Art, Music, PE, etc.  I don't know how much ink I used on these, so let's just say these were less than $1.50.  Once again, they were definitely well received!!  These I have a little explanation.  I had the idea and got to messing around on the computer to try to make a soup label.  I ran down to the recycle bin to get a can so that I could get the size of the label correct before I started putting all of the wording on the can.  Got it all printed and I was stoked!!  Just ask my friends, they all got texts about it!  So, off to the Dollar Store I go to get soup and lo and behold they only have the 30% more cans of Campbell's! Alrighty then!  We all probably know that ink isn't cheap, so I came up with a plan on the fly by adding black construction paper.  TA DA
Here's the label before adding details.  I had on hand a gold marker to add embellishments to make it look more similar to the real soup.

Peach Beach


These were for the classroom teachers and assistants.  The card reads:
All year long you've been a peach, now it's time to relax at the beach!
Bottom is a magazine, beach towel, handmade card, and gummy peach rings then tied up with some ribbon.  These were $7 (Look for beach towels on sale!  Plus I used a coupon and saved 20%)

If I were to do it again I would use something different instead of the candy.  I just canned some peaches and soon some peach jam, which would actually be a little more "me".  Once again, I had the idea and ran quick with it.  Plus, I kind of procrastinated getting started <blush>


A few other school appreciation things we did last year were a big hit and plan to do them again! 

Christmas Break
At our school there are several staff members who stand outside loading and unloading cars in all weather.  This is NC and it isn't as cold as say Michigan, but it gets a bit nippy.  We made a big batch of hot chocolate in the crock pot overnight.  In the morning I had a plastic bin big enough for 8 styrofoam cups with about an inch of rice in the bottom.  I heated the bowl and rice in the microwave to get it nice and warm.  Added the cups nestled in the rice to keep them warm and stable.  Filled up the cups right before walking out of the door.  Thankfully my husband was able to go with us that morning to help!  The teachers loved this!!  And I had the girls tell them "To keep you sweet and warm!"

Teacher Appreciation Week
When teacher appreciation week came around we had the girls make cards for their teachers.  I wanted to do something similar for the ladies outside again.   I made 2 gallons of homemade lemonade (reusing jugs from distilled water that I use for making cleaners) When it was time to pick up the girls I put the lemonade and cups into a small cooler.  I set-up in a high traffic area outside the school and poured lemonade and had the kids take it to all of the teachers and staff and say "Thank you for quenching our thirst for knowledge"  I actually made business card size handouts with pictures of lemons and that saying.  I cut them all out and left them at home!  


Bubbles

Our kids LOVE bubbles! A few pennies can stretch a long way in homemade fun here!!  I have tried many different recipes found on the internet and I will say that they've all pretty much worked just fine.  I will add my favorite for you (and for me so I don't have to try to find it each and every time I want to make them!) And as always, I will do my very best to credit where I found my ideas! I do have a bad habit of writing things down and forgetting.  I'm sure I'm not alone here.  You can always follow my blog here for cool ideas and be sure to follow me on Pinterest, which is where a lot of ideas stem from!  My Pinterest Boards!

These were called the "Worlds Best Bubbles"
1 1/2 quarts water, 1/2 cup light corn syrup, 1 cup liquid dish soap. Mix water & corn syrup until completely blended. Slowly stir in soap. Will last several weeks in airtight container.
My source


I have found that using distilled water yields the best bubbles.  If you do not have this, simply boil your water before using.  I also have found that heating the water and corn syrup really helps a lot to get them combined easily just don't let it boil.  If you need to boil your water, just add the corn syrup as it cools. We also use eco-friendly dish soap versus most posts I see calling for Dawn and you can see the picture below it works just fine!  I have used both Method and Seventh Generation.  (Pictured is Method)

In addition to just some bubble recipes, a good craft for recycling AND bubbles combined!  SCORE!!  This is one that I found a Wiki-How link for, but I have my own way of doing it. 

SNAKE BUBBLES!
 Here is what you will need.  Raid your recycling bin for bottles and what house with kids doesn't have a few unmatched socks!?  These have been lonely for a long time, I think that their mates are officially MIA! You can use the rubber bands alone, duct tape alone, or combination of the two. 
 For some reason they both wanted the striped sock so we settled this with a good game of rock, paper, scissors HAHA
 Cut your bottle to allow the sock to fit over the end.  I also cut the sock so it isn't as bulky on the bottle.  I made a BUNCH of these for a birthday party and learned that the excess sock can be a bit frustrating. 
 Depending on what you have on hand you can cover the edge of the sock with tape as seen above (make sure a good portion of the tape is on both the sock and the bottle to get a good seal)  Or below you see just the rubber band.  You can also take the rubber band bottle and add duct tape as well.
 And here we go! Fun for hours!!  Our girls enjoy blowing bubbles then filling up various containers and such that they have out in the yard.  Use the bubbles in a water table to play kitchen (as well as clean they outdoor toys SCORE again!)  Set up a toy car wash, the possibilities are endless!! 
UPDATE: I also have ratio for making just shy of 5 gallons of homemade bubbles!!  Comment below if you'd like to see it!! 

Tuesday, July 30, 2013

Gender Reveal Idea!

I have pinned this image to Pinterest and it keeps getting shared, however, until now there hasn't been a website to link it to.  It is pretty easy to understand just from a picture, but now I can add it here for some explanation! 

When we were looking to announce the gender of our youngest child we wanted to do something different!  I had seen the cakes, balloons, and various other ideas.  Being military and far from family, I also wanted to do something that I could email or text.  That's when the jingle for the old Almond Joy and Mounds commercials got my gears turning.  A little bit twisted but sometimes you feel like a nut (Almond Joy for a boy) and sometimes you don't (Mounds for a girl) ;o)  So, I set up our tripod camera and after about 20 tries, I finally got the right angle and light for the picture.  (Camera was set on a self timer and I had to push it, then get myself set before it took the picture in 10 seconds)  I HIGHLY recommend getting help with this endeavor though!!  Oh, and the candy bar was stuck to my belly using duct tape. HAHA  The caption when we sent this out read:  Here's the gender reveal picture of the baby! 

Monday, July 29, 2013

Warm, fragrant bread!

There's not much I enjoy more than the smell of fresh baked bread!  There are so many choices these days on the shelves, but what most people don't notice are all of the ingredients that really don't NEED to be in there.  Now I love a good loaf of artisan bread with nuts, oats, grains, or seeds and the kids do, too!  However, there's something nostalgic for me and a good ole loaf of white bread.  I'd rather the kids eat homemade white bread everyday than to eat the store bought grain this and that bread that was baked over a week ago.  

Ingredients to Make 2 Loaves:
-2 cups warm water 
-2/3 cup sugar
-1 1/2 tbsp yeast
-1 1/2 tsp salt
-1/4 cup canola or vegetable oil
-6 cups flour


 I can't believe I forgot this when introducing the family!  Here's Badger!  He's a 7 year old Border Terrier.  If I stand still for more than a few seconds this is where he ends up! 
 Mix the sugar, water, and yeast in the bowl of your mixer that has been fitted with a dough hook.  As far as the water goes I think of it as baby/kid bath water temperature.  Not too hot but a little over luke warm.  Let these sit for about 10 minutes until it looks like this. **Then add oil and salt and mix.
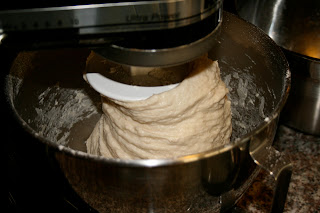
 I add the flour in about 3 batches.  Always let the flour completely incorporate before adding more.  Once it starts to climb up the hook, mix the rest of the flour in by hand just until the dough is not sticky.
 Plop (technical term hehe) it into an oiled bowl, cover, and let rise for one hour.  You can use plastic wrap or a towel.  The warmer the location the more/faster it will rise.  I place mine on the stove.  If you have little ones running around like I do, I recommend setting a timer ;o)
 Dough has risen and here's how I set myself up for making it into loaves.  These just happen to the pans I have to make one large loaf and two smaller ones.  This recipe works great shaped into hamburger or hotdog buns (I'll post those another day)  Punch the dough down in the bowl and turn it out onto a floured surface.
 I cut the dough into the sizes I need, shape, then place in well oiled pans.
 Here's a good example of why I am calling this Imperfectly Homemade.  I have NEVER made 2 loaves of bread that look the same! 
 Set them in a warm spot to rise and cover with a towel.  In reality they should rise for about 30 minutes.  In our house it all depends on what is going on.  If in a time crunch I may let them rise 15 minutes (while oven is warming) or the opposite they may rise an hour if I am cooking dinner or have to run to the store.  Either way, it tastes wonderful!!  They will rise more as they bake!

Bake in a 350 degree oven for about 30-40 minutes depending on the size of the loaf.  For these, the small ones will bake right at 30 and the large about 38.
Let the bread stay in the pan for about 5 minutes, then turn out onto a baking rack.  Force of habit from cooling cakes, I always put mine on a cloth to cool.  Now, these could have risen more but I really wanted to get these done and have a nap before the little one gets back up in a little while =)  Now try to wait until they are cooled before you cut them. GOOD LUCK!!! 


Preview

While waiting for the bread to rise and bake, here are a few pictures of what to look forward to!  

COMING SOON to Imperfectly Homemade!!
 Homemade Cabbage Doll anyone??
 Homemade Dairy Free "Goldfish" crackers
 Homemade Hamburger buns
Purse/Clutch made of Duct Tape!